Dropbox has a nice feature: It can automatically upload your screenshots and copy the share URL to your clipboard, ready to paste somewhere. However being a non-paying user, free space in my dropbox slowly decreases. I was also annoyed by the fact that the upload and/or generation of the sharing-URL took quite a few seconds. Also, the dropbox page sometimes was slow to load.
Since I have my own server, I thought, there must be better, self-hosted solutions out there. Turns out there are quite a few tools capable of automatically uploading your screenshots via (S)FTP, for example FileShuttle and ScreenCloud. I couldn’t find one that would ask me for a filename though (well, ScreenCloud can do that, but I don’t like it because you have to press enter after selecting an area, also it currently cannot screenshot anything on secondary monitors due to a bug). I thought about what I want from such a tool and it came down to this:
- use the default shortcut Cmd+Shift+4 with the ability to toggle between ‘select area’ and ‘select window’ via pressing Space
- let me use date and time or a short random string as filename
- also let me enter my own filename
- be simple, quick and lightweight. I don’t need a GUI with a gallery of taken screenshots or anything
- upload image to a predefined (S)FTP location and store a HTTP URL in the clipboard
- pop up a notification, telling me that the screenshot has been uploaded
I couldn’t find a tool fulfilling all these requirements, so I made something with Automator:
- Run shell script:
screencapture -i ~/Desktop/tmpScreenshot.png
This invokes the usual interactive screenshot capture tool you also see when pressing Cmd+Shift+4.
- Run AppleScript:
on run

	set cryptname to do shell script "/opt/local/bin/pwgen -cns 5 1"
	set datename to do shell script "date -ju +%Y-%m-%d_%H.%M.%S"
	set cryptbutton to "Use \"" & cryptname & "\""
	display dialog "Filename (extension will be added automatically)" default answer datename buttons {"Cancel", cryptbutton, "OK"} default button "OK" cancel button "Cancel" with title "New screenshot"

	if button returned of result is cryptbutton then
		return cryptname & ".png"
	else
		return (text returned of result) & ".png"
	end if
end run
This requires the tool
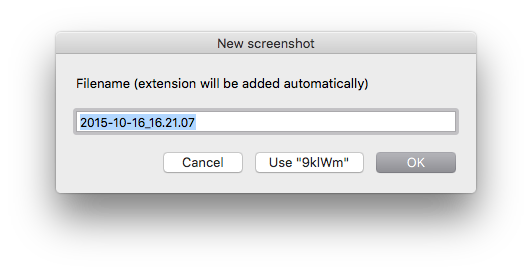
pwgenI installed via MacPorts. It’s a simple CLI password generator. The-cnsflags mean include at least one capital, include at least one numeric and be secure (random password). The 5 means I want the string to be five characters long.The resulting dialog looks like this:
 I mostly want the filename to be date and time, so that’s a good default. For quick throwaway screenshots I prefer short random strings, which can be chosen with a single click. And if I want, I can even just start typing a custom filename.
- Run shell script using pass input as arguments:
HOST='my.serverhostname.com'
USER='Jay2k1'
REMOTEFILE="/the/path/to/upload/the/image/to/$1"
LOCALFILE="/Users/Jay2k1/Desktop/tmpScreenshot.png"
# copy image and delete local file
scp "$LOCALFILE" "$USER@$HOST:$REMOTEFILE"
rm "$LOCALFILE"
# copy http link to clipboard and return the same link minus the "http://" part
echo "http://$HOST/$1" | pbcopy
echo "$HOST/$1"
This takes care of uploading via SCP and the clipboard part. I don’t need to pass a password because I use passwordless login via public key authentication.
- Set value of variable: (use any name you want)
- Show notification: Title: “Screenshot uploaded”, Subtitle: (the variable you just created), Text: “This link was copied to clipboard.”

That’s it! Now we need to make our standard keyboard shortcut invoke this AppleScript:
- Because I initially created it as workflow, I had to use “File -> convert to…” to convert it to a service and save it using a descriptive name (“take screenshot and share”).
- in System preferences -> Keyboard -> Shortcuts, click “Screenshots” in the list and untick the one that uses Shift-Cmd-4
- Now click “Services” in the list on the left and scroll down. The last entry in the list is the newly created “take screenshot and share”. Select it and double click “shortcut”, then press Cmd+Shift+4.
Done! Now I can press Cmd+Shift+4, get the area selection mouse cursor, can either select an area or press space to select a window, choose a filename and get a share URL in the clipboard.
Caveats:
- There is no input validation in the “enter filename” dialog. It could be empty or contain illegal characters for a filename/URL
- when the cancel button is pressed, Automator throws an error, I’d like to silence that but don’t know how


