Using 2FA certainly adds a good layer of security, and the Google Authenticator app is probably one of the most commonly used apps for that. It just has a big disadvantage: If your phone gets lost or stolen, you’re out of luck and you should hope you have saved recovery codes or can recover your accounts via e-mail. Either way, it will be a big hassle.
Other 2FA apps, such as Authy, 2FAS or Aegis have the ability to make automatic encrypted backups of their database to Google Drive or other places*, so you’re safe not only when you migrate to a new phone but also if you lost access to your old one. This is the main reason I’ve wanted to migrate away from Google Authenticator for a long time.
*) Aegis cannot automatically backup to Google Drive but works with NextCloud, which is fine for me. 2FAS works with Google Drive only. Both apps can import Google Authenticator QR codes (see “without root” section below). Authy reportedly can not do this, so I did not bother testing it.
Until today, I never did though, because a few Google hits I looked at all seemed to suggest there is no way to export them from GA and then import them somewhere else, which means I’d have to log into each service, deactivate 2FA, and then activate it again, scanning the QR code from the new app this time. What a tedious process, especially if you have a lot of accounts (I have 12 at this time).
Here are two solutions that work at least with Aegis (which is free and open source by the way):
1. With a rooted phone
- Aegis can import from many apps, including Google Authenticator, by directly reading their respective database file (that’s what you need root for).
- Alternatively, you can use a file picker in Aegis to locate a database file of the app you want to migrate away from. I tried copying the file from the phone using adb, but that, too, requires root, and unfortunately, I never rooted my current phone…
2. Without root
- Google Authenticator has a “transfer accounts” menu item, open it and choose “export accounts”
- After authenticating, you can choose which accounts to export. This method does not work with too many accounts at once, 12 did not work for me but 8 did. So go ahead and select a maximum of 8 accounts for now (you can try more but it might fail).
- You will be presented with a QR code that contains all selected accounts. You will need to scan this code with Aegis later on (this method might also work with other authenticator apps, I have only tested Aegis though). But how do you scan this code from the same device, you ask?
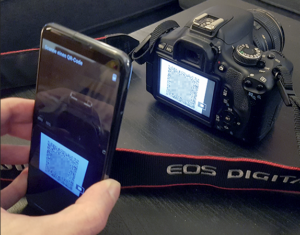
- Because Google Authenticator prevents you from taking screenshots, you need to get this QR code off your phone in a different way. A few ideas:
- use another phone’s camera to take a photograph of your phone screen (maybe you still have an old phone or you can borrow the phone of a friend or family member)
- use the webcam of your laptop/computer
- use a real camera or camcorder (I used my Canon DSLR)
- you could probably put your phone on a flatbed scanner or photocopier, you might need to turn down the screen brightness though
- Switch to Aegis (or whatever new 2FA app you use), tap the “add” icon and choose QR code as you would when adding a new account
- Scan the QR code from step 4. All your exported accounts should magically appear! Tested with Aegis and 2FAS, reportedly not working with Authy

- If you have more accounts configured in Google Authenticator than you exported, repeat from step 1 for the remaining accounts
- Done! Now in your new app, make sure you have some sort of automatic (cloud) backup configured. Also, you can probably remove Google Authenticator now – I will leave it on my phone until I’m sure the new app works well. Do not forget to remove the photo you took from the device you took it with!
This was certainly easier and faster than logging into each single account and disabling and re-enabling 2FA there.
Thank you for this wonderful idea to someone named Michiel, who mentioned this method in a comment on this page.

Thanks for this – I actually found that my phone allowed me to take screenshots of the QR codes, so I just took screenshots, and imported them all into Aegis in one go and it worked perfectly.
Thank you. This really helped me. The fact you wrote a few ideas for workarounds of not being able to take a screenshot is a really nice touch.